Do you need to improve your marketing as a financial advisor?
Financial advisors across the country are now working from home due to the coronavirus pandemic. Even if you can’t meet with prospects face-to-face, there are steps you can take to improve your marketing—beef up your online presence and attract your ideal clients—without even leaving your couch.
I’m going to share with you five simple things you should do today to improve your digital appearance as a financial advisor. These tips build off of each other, so you’ll have the most success if you do them in sequential order.
And just a heads-up: we show you exactly how to complete each tip, so feel free to follow along and complete each task as you read through the article and watch the videos.
Let’s get started.
Improve Your Marketing Step 1: Grow Your Email List (Export Your Contacts From Outlook Or Gmail & Import To Mailchimp)
The first step to improve your marketing and grow your business is to have a solid email list in place. Why? Because email is still the bread and butter of marketing. It drives traffic to your website, builds trust, helps people understand what you do best, and turns prospects into lifelong clients.
So, for tip #1, we’re going to show you how to export your email list from Gmail or Outlook and import it into Mailchimp. This way you can keep on winning over prospects even while you’re stuck at home.
First up, you need to export your current email list from Gmail or Outlook. This part is pretty easy thanks to Google’s and Microsoft’s clear instructions. If you use Gmail, follow these steps to export your contact list as a CSV file. If you use Outlook, follow these steps. (This part should take no more than 5 minutes.)
Once you have your exported email list, it’s time for the fun part. We’re going to import them into Mailchimp. To complete this step, watch the video or follow the instructions below.
Log in to your MailChimp account and navigate to the Audience tab at the top of the screen.
- Click the Manage Audience drop-down menu and select Import Contacts.
- Make sure CSV or tab-delimited text file is selected (it should be by default), and click Continue to Setup.
- Browse to find the CSV file you exported and click Continue to Match.
- Check to make sure the fields match. Then click Continue to Review.
- Organize your contacts by creating a tag for them. You could label them as current clients, prospects, COIs, event participants, or whatever you’d like. Then click Continue.
- You’ll see a You’re all set to import! message if you’re ready to import. If you get an error message instead, follow the steps to correct any mistakes. Then click Import.
- The next screen will tell you how many contacts were successfully imported and how many were invalid.
Quick tip: MailChimp doesn’t let you import role-based email addresses that start with words like admin or info. If you have any role-based addresses in your list, see if you can get a better email address for that person. Then you can manually add them as a contact in MailChimp.
Here’s how to do that:
- Log in to MailChimp and click on the Audience tab at the top of the screen.
- Hover over the Add Contacts section and click Add a subscriber.
- Enter your contact’s email address, first name, and last name.
- Tick the two checkboxes at the bottom of the screen. The first box confirms that the person gave you permission to email them. The second tells MailChimp to update this person’s profile if they’re already on your list (which helps prevent duplicate contacts).
- Click Subscribe.
That’s it! Now you can send personalized emails to your newly imported contacts whenever you like.
Do you use Constant Contact instead of MailChimp? Here are instructions on how to add people to your Constant Contact email list.
Improve Your Marketing Step 2: Upload Your Contact Lists To LinkedIn & Grow Your Network In Seconds
If you’re looking for an effective way to increase your online following, it doesn’t get any easier than LinkedIn. All you need is an exported contact list from your CRM, email marketing platform, or a spreadsheet of clients and prospects you created yourself. You can even use the CSV file you exported in Tip #1.
Once you have that list in hand, you can easily add hundreds (or thousands) of new connections on LinkedIn in less than two minutes.
Watch the video below to see a walkthrough of exactly how to import your contact list to LinkedIn:

To recap, all you need to do is follow these simple steps:
- Log in to your LinkedIn account.
- From your LinkedIn home dashboard, click the My Network tab at the top of the screen.
- Choose More Options from the left-hand navigation menu.
- You’ll see several upload methods appear on the screen. Click the Upload a File option (the last one in the list).
- Browse for your contact list and click Upload.
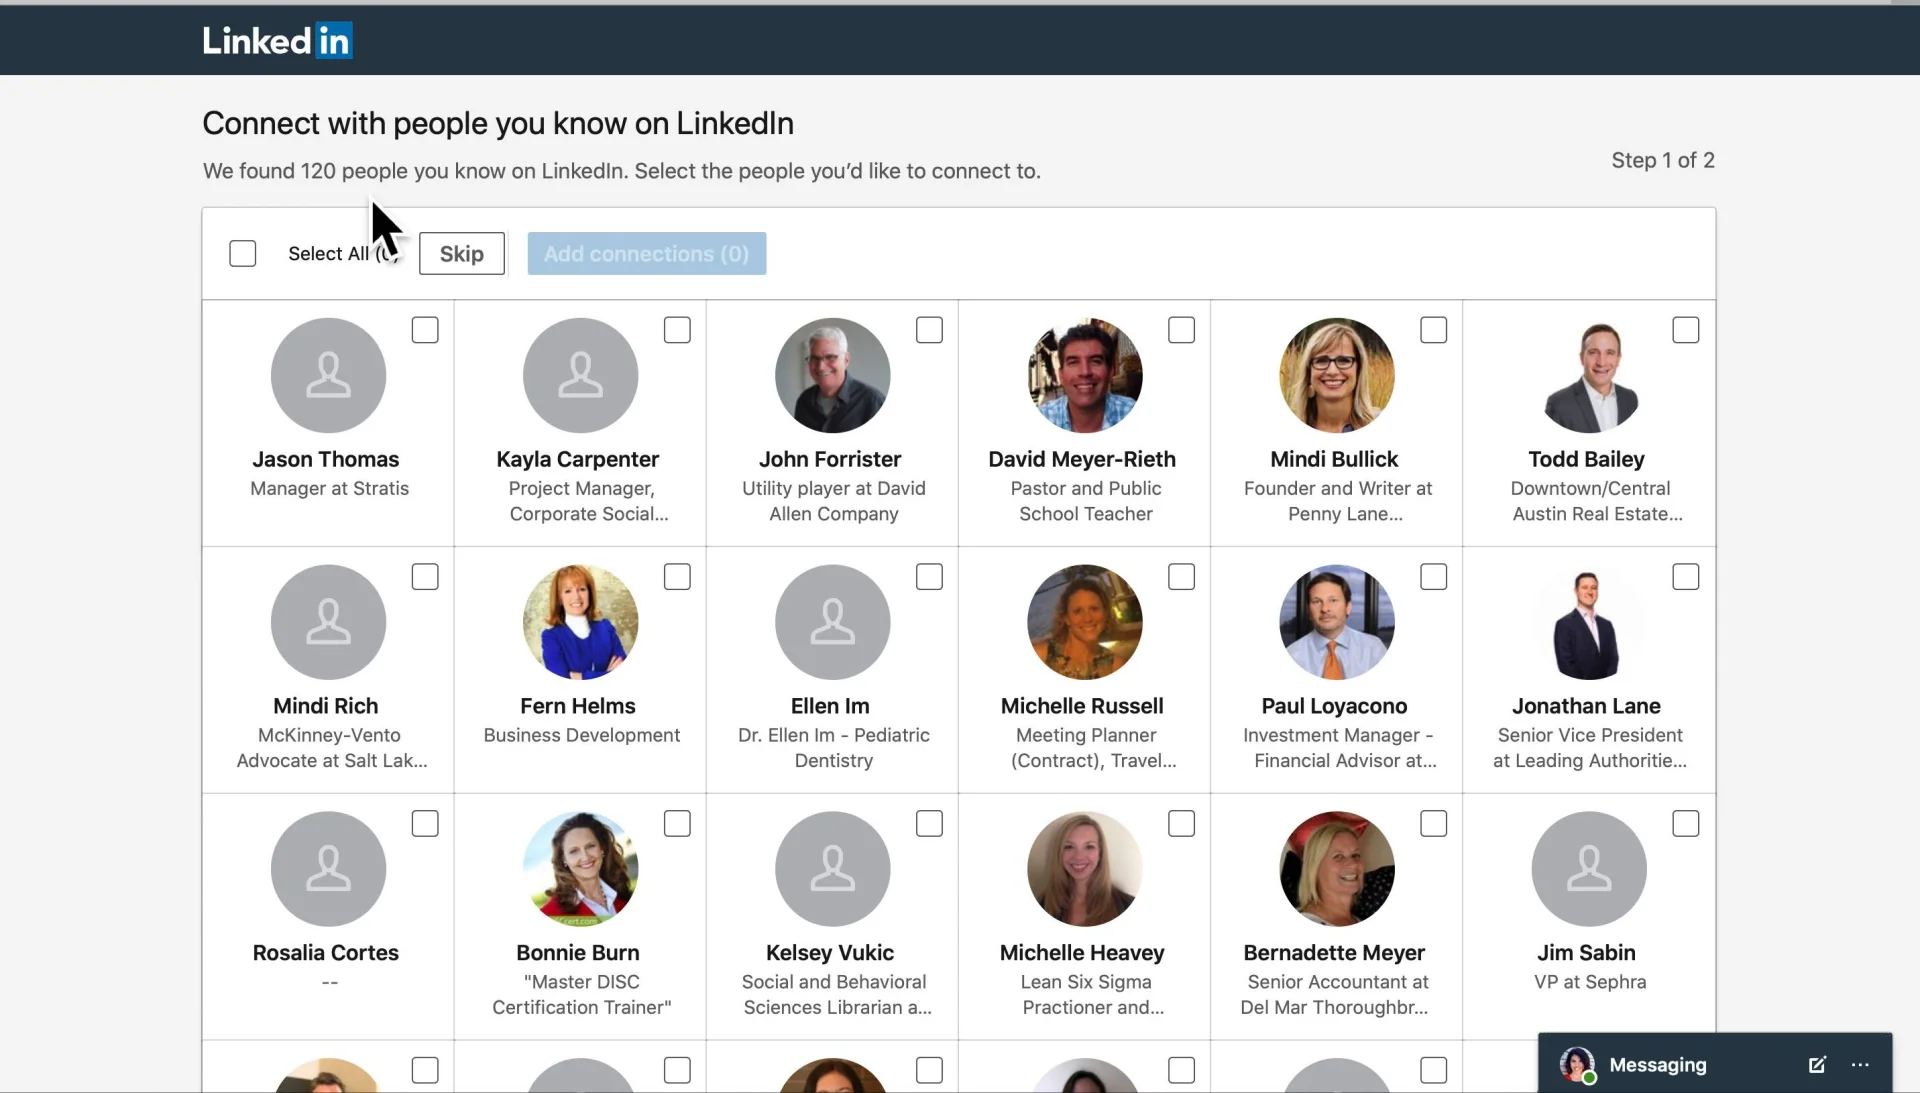
- You’ll then see a grid of all the people from your contact list who are on LinkedIn. Click the Select All checkbox, then select Add Connections.
- The next screen asks you if you want to send an invite to the people on your list who aren’t on LinkedIn. We recommend clicking Skip for this step.
Once you’ve gone through these seven steps, your connection invites are officially sent. Your prospects, clients, and colleagues will begin seeing your posts as soon as they accept your invitation.
Improve Your Marketing Step 3: Create A Professional Email Signature (Using HubSpot’s Free Generator)
Want to create an eye-catching email signature for free? HubSpot’s simple online tool lets you generate a professional email signature that’s brand cohesive and includes all your important contact information (a win-win in our book).
Watch the following video to see how to create a free email signature in less than 10 minutes:

Or, follow these steps:
Step 1: Choose Your Template
Go to HubSpot’s free email signature generator.
Uncheck the Created With HubSpot button at the top of the screen. (If left selected, this generates an ad in your email signature that invites others to create a free signature.)
Then choose your email signature template. We chose Template 6 in the video above, but feel free to use whichever style suits your preference.
Step 2: Add Your Signature Details
Go to the next tab and enter your signature details. This includes information such as your name, job title, company name, phone number, website, social media profiles, and more.
If there are any pieces of information you don’t need—such as a physical address—leave those fields blank. But we highly recommend adding your social links for LinkedIn, Facebook, and Twitter, so prospects can connect with you online.
Step 3: Add Your Brand Colors
Now it’s time to move on to the stylized tab, which is where you’ll customize your signature’s theme, text, and link colors to match your brand.
If you don’t know your brand colors, that’s okay. You can upload your logo to Pine Tool’s Image Color Picker, and the free tool will generate codes for the colors used in your logo. You can then copy and paste these codes into HubSpot.
Quick tip: If you’re leaving your text color black as default, we recommend changing it to a dark gray (try #555555) so it doesn’t look as stark against the white background.
Step 4: Add Your Custom Images
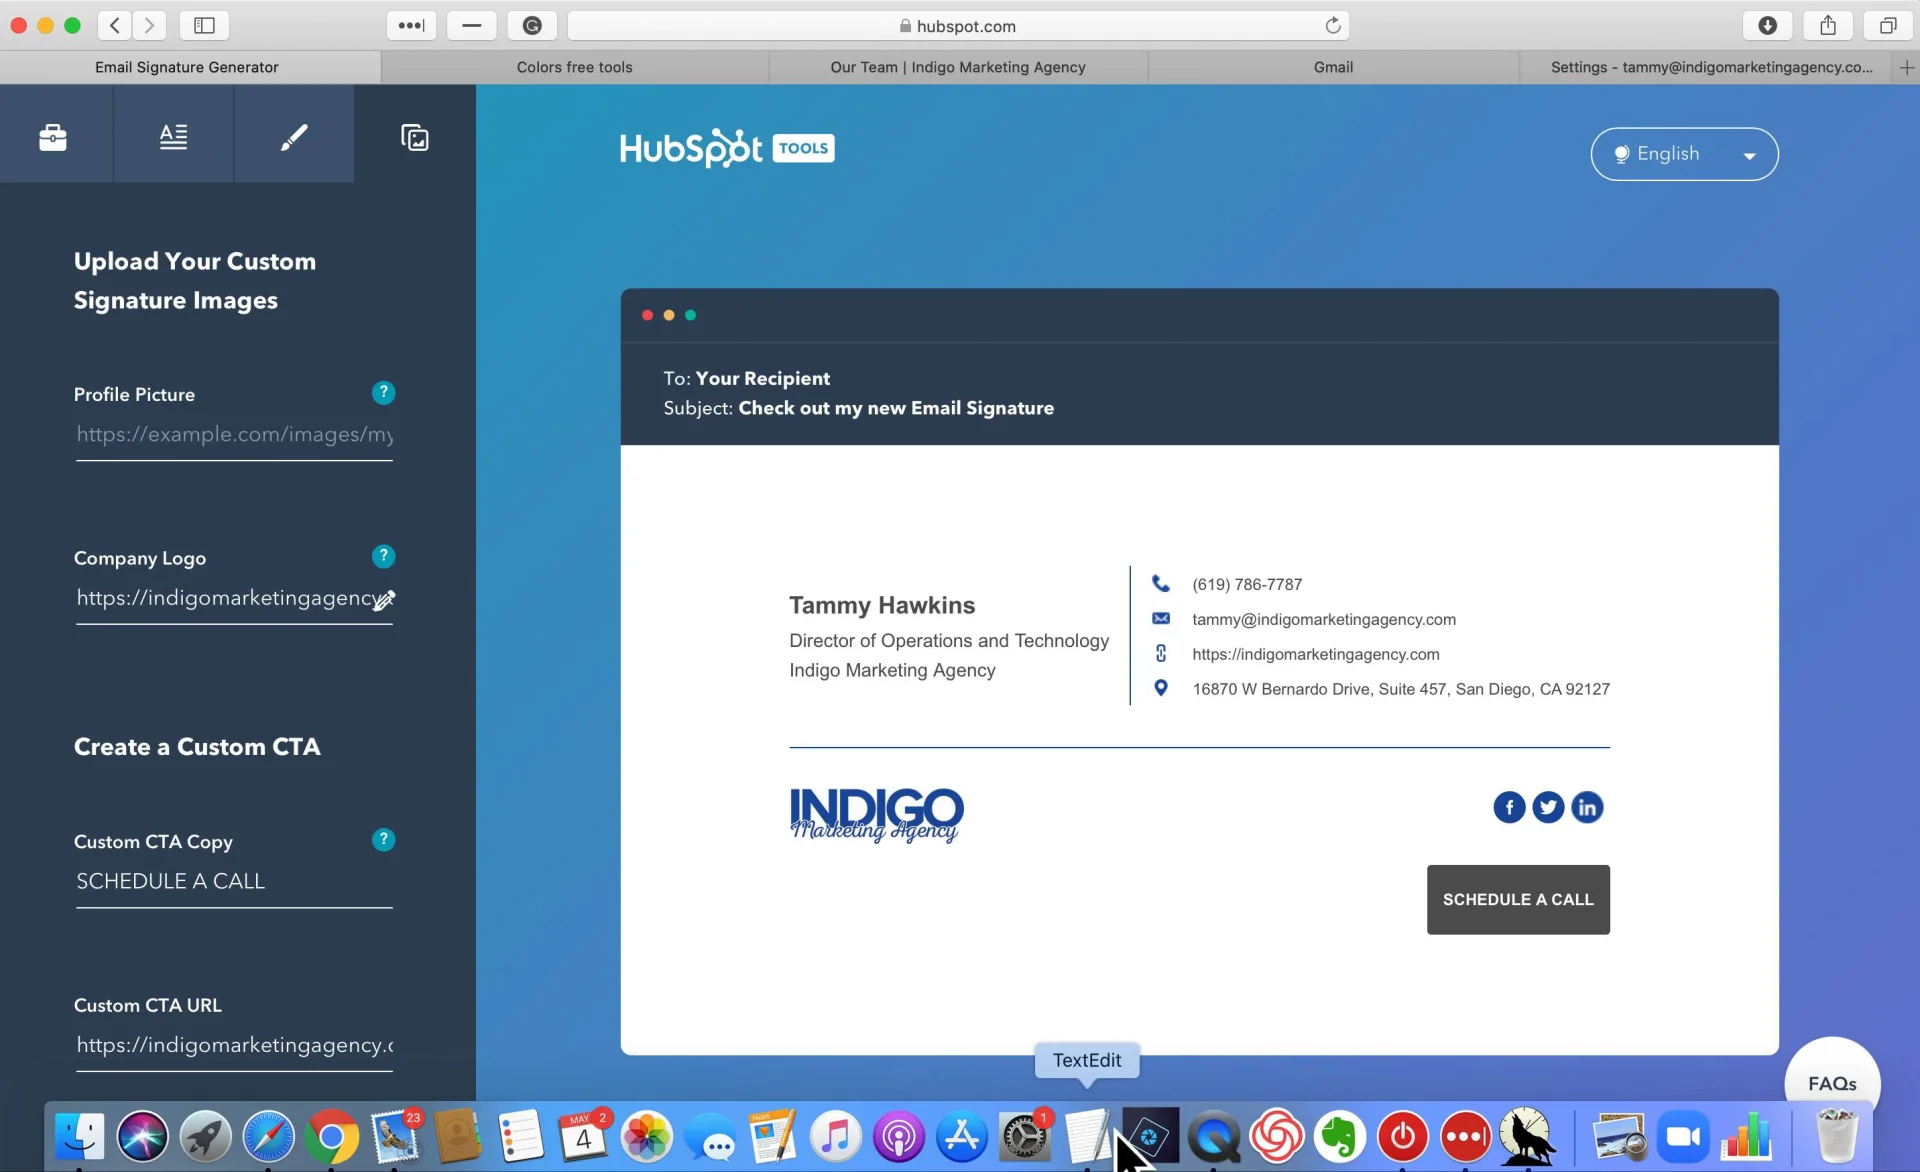
Click over to the last tab to add custom images to your signature, such as your profile picture, firm logo, and a call-to-action button.
Adding a profile picture is optional. Some advisors like to do it because it adds a level of trust to their communications and makes them more recognizable. But this part is up to you.
If you’d like to add a profile picture:
- Go to your website.
- Right-click on your photo, and select Copy Image Address.
- Paste it into the Profile Picture section of the generator.
Next, you’ll want to add your financial advisory firm’s logo. The generator doesn’t let you upload an image of your logo, so you’ll need to grab the logo link from your website. If you don’t have it, ask your admin or website developer to get it for you. Then copy and paste the link into the Company Logo section.
Lastly, you’ll want to add a call-to-action button so prospects can schedule an appointment with you directly from your email signature.
Quick tip: If you create a Calendly account in #4 (below), you can use that as your call-to-action button link.
Step 5: Add The Signature To Your Email
You’re almost finished! Now it’s time to generate your signature and add it to your email. Here’s how you do it:
- Once you’ve gone through all four tabs, click the Create Signature button. Then click Copy Signature.
- Go to your email account and navigate to the settings. Look for the spot to change your signature and paste the information into the box.
- Save your changes.
After you generate your free signature, you’ll get emails from HubSpot inviting you to try their CRM. If you’re not interested in this service, click Unsubscribe in the footer of the email; this way you’ll stop receiving communications from them.
Improve Your Marketing Step 4: Set Up Calendly So Prospects Can Schedule A Call Online 24/7
An appointment scheduler allows prospects to schedule a call with you at any time. Instead of having to go back and forth with you via email to set something up, they can instantly look at your availability and choose a time slot that works for them.
There are dozens of appointment schedulers out there, but our personal favorite is Calendly. It’s free, easy to use, and looks professional. Plus, Calendly syncs to your calendar, so it automatically knows if you have a dentist appointment, a meeting, or any other scheduling conflicts.
Watch the following video to learn how to set up your Calendly account and configure it for your website.

Or, follow these steps:
- Go to the Calendly website, enter your email address, and click Sign Up.
- Log in with Google and follow the prompts to finish creating your account.
- Create a URL that has your name or your firm’s name in it.
- Now it’s time to configure your Calendly account. You can customize one of the default event types or you can create your own. To create a new event type, click the Event Types tab at the top of the page.
- Click + New Event Type, go to the One-on-One section, and click Create.
- Give your event a name (such as Get Started Now), and click Next.
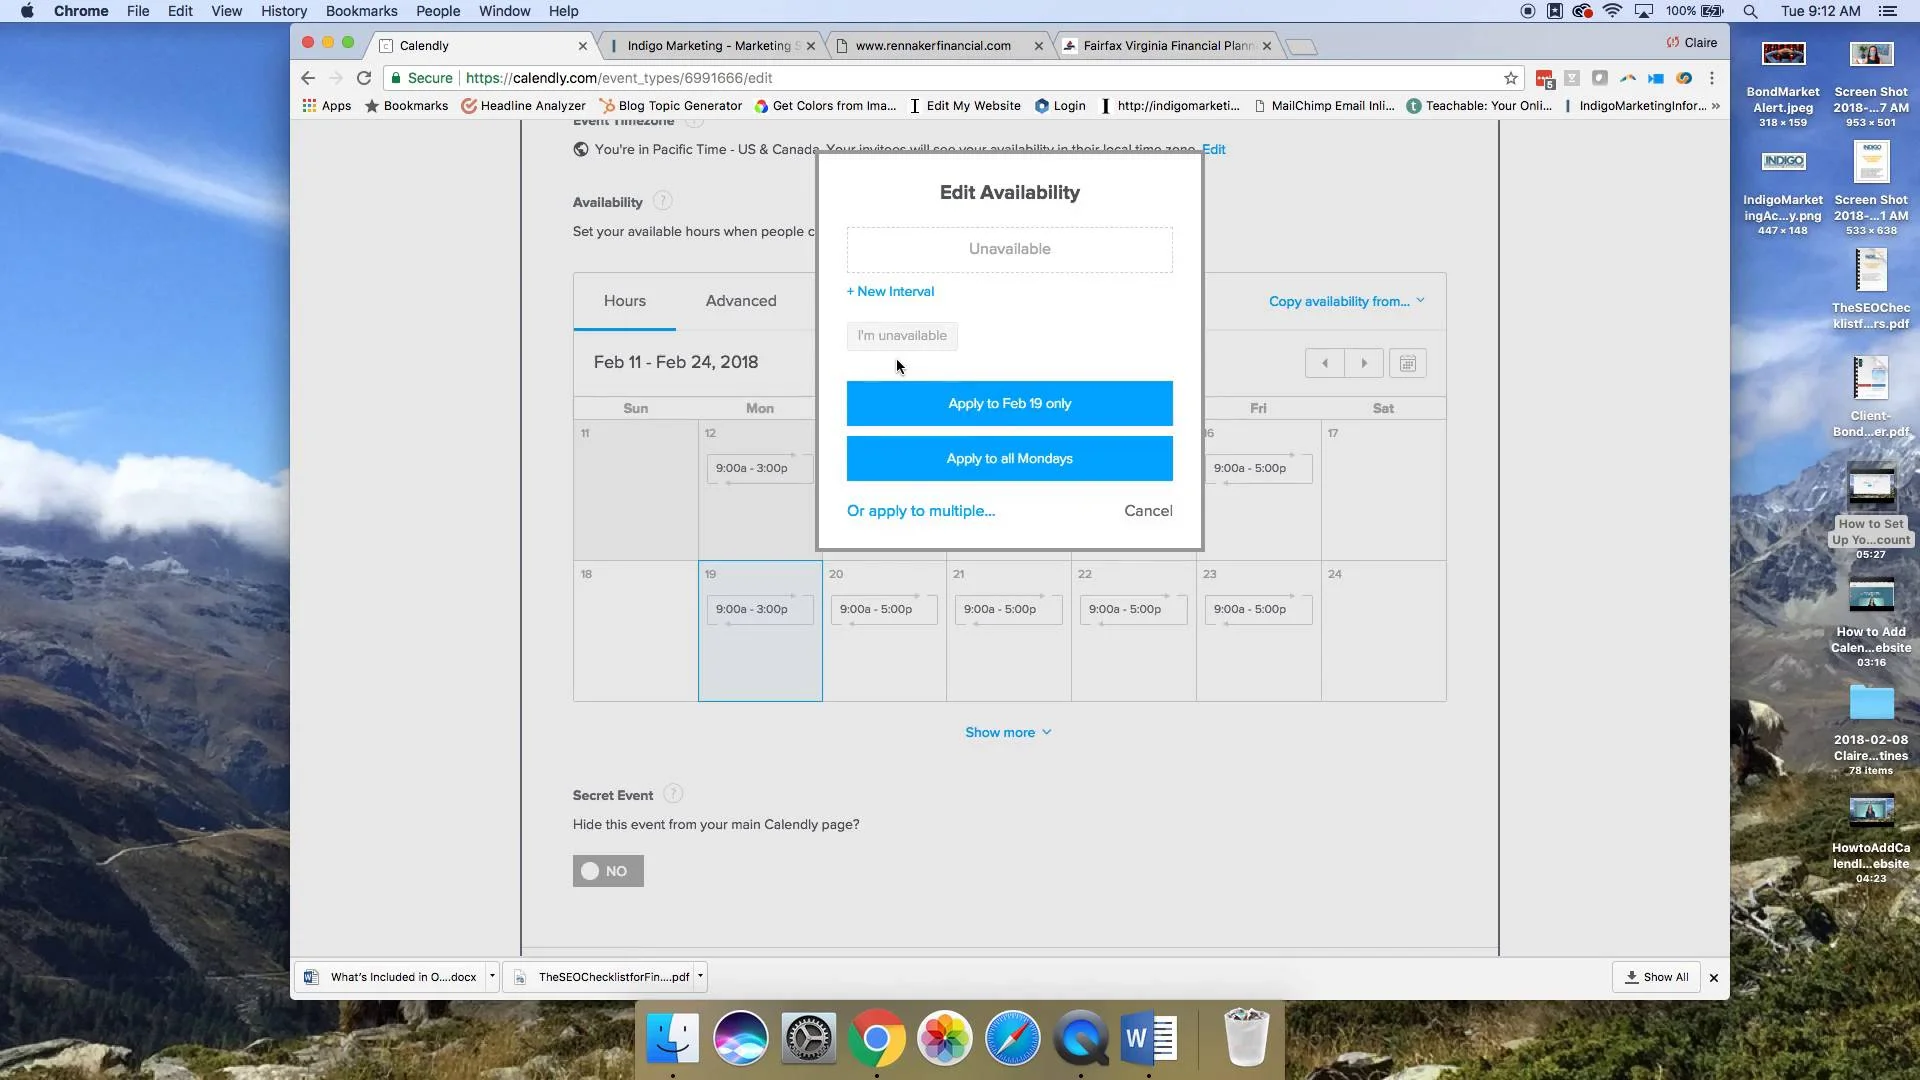
- Customize your event by changing your time zone, your availability, the duration (I usually go with 15-minute introductory meetings), and how far in advance someone can schedule an appointment (I usually do 24 hours).
- By default, Calendly requires each person to enter their full name and email address when they schedule an appointment. But you also need to know their phone number. To add a required line for phone number, go to the Invitee Questions section.
- Click the + Add A New Question button, and enter Phone Number into the Question field.
- Check the Required box, and click Apply.
- Next, you’ll want to personalize your notifications. To do this, click on the Invitee Notifications section and turn on Email Reminders.
- Click the View live page button to make sure everything looks good.
That’s all you need to do to set up Calendly. If you want to customize your account even further (which I recommend doing), I have some favorite tips and tricks. Go ahead and click on the Advanced tab under the When can people book this event? section. Then follow these steps:
- Don’t want to have back-to-back calls? Go to the Availability Increments section and use the drop-down menu to choose how often you want your availability to show.
For example, if your prospects are scheduling 15-minute meetings, you could change your availability increment to 30 minutes. That way someone can only schedule a call with you every half hour (and you have a 15-minute buffer in case a phone call runs over).
- Next up is the Event Max Per Day section. This lets you limit the number of calls that can be scheduled in a day. So, if you only want to have a maximum of four introductory calls a day, you could set that limit in this section. Then, once four calls are booked, that day becomes unavailable on your calendar.
- The last tip can be found in the Minimum Scheduling Notice section. As it sounds, this section lets you limit how soon someone can schedule a call with you. By default, this is set to 4 hours, which means someone could potentially schedule a call the same day. I always change this to 24 hours so I don’t have an appointment sneak up on me. But you can adjust it depending on your needs.
Once your advanced settings are how you like, don’t forget to hit Save & Close.
Improve Your Marketing Step 5: Add A Calendly Floating Button To Your Website (So Prospects Can Schedule A Call From Any Page On Your Site!)
Now that you have Calendly set up, it’s time to add it to your website. We recommend adding it as a floating Schedule A Call button that remains in the bottom right corner of your website at all times. Here’s an example of what we mean:

A floating button is beneficial because it allows prospects to quickly schedule a call with you—no matter where they are on your website. It also serves as a gentle reminder that you’re available to chat with them whenever they’re ready.
Adding the floating button to your site is easy, but it’s not intuitive. To figure out how to do it, watch the following video:
https://indigomarketingagency.wistia.com/medias/jrwya8l2ft
Or, follow these steps:
- Log on to your Calendly account and click the drop-down carrot next to the Account section at the top of the screen.
- Click Share Your Link from the drop-down menu, and click the blue box next to Add to Your Website.
- You’ll see three options for adding your link to your website: inline embed, pop-up widget, and pop-up text. Click Popup Widget, then Continue.
- Click Copy Code.
- Log in to the back end of your website.
- Navigate to the header section, which is where you can add code to every web page all at once.
Quick tip: Every website platform has the header section located in a different area. But just look for the word “header” in the back end of your website and you’ll know you’ve found the right place.
- Paste the code into the HTML header section and save it.
- Publish your website.
- View your live site to confirm that the floating button is at the bottom of every page.
The floating button has Calendly branding on it by default. If you want this removed, you can buy a Premium subscription to Calendly, which costs $8 per month. The paid version lets you create more than one event type, which could be worth the price depending on your situation.
If you’re stuck at home due to COVID-19, it’s the perfect time to invest in your marketing so you come out of this crisis poised for more success than ever. Take these five steps today and let us know if you get stuck, we’re happy to help.
Looking for more ways to improve your marketing as a financial advisor? Find more information on our blog. Or learn more about how we help financial advisors just like you grow their businesses with our Total Marketing Package.


